|
|
Bird Feeder
Cedar Plans - 2 plans (Original & Improved)
|
Original Plan:
(Improved Plan follows)
Feel free to use and/or download any of our graphics.
For those of us that like written directions:
List of Materials:
1"x 6" x 5' Fence Board.
A few Nails.
A little Glue.
1. Start with the Cedar (or any non-pressure treated wood) fence board (1"x 6"x 5'), which is usually
about 5/8" thick, about 5 1/2" wide, and usually very close to 5' long.
The rougher the better.
2. Cut it as shown below (Measurements are given in both the English system (for those of us in USA) &
Metric (for everyone else (even the English use Metric)).
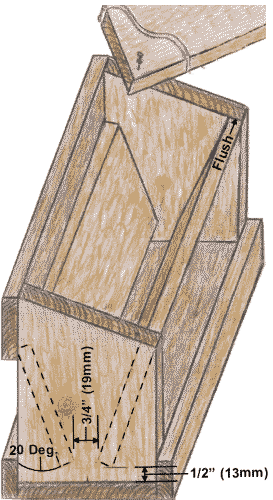
3. Make the top edge of one of the Side boards flush with the sloping top of the End boards
at the beginning (lowest part) of the slope - as shown in the drawing with the right Side board.
This will make an angle of approx. 20 degrees with the front and put the bottom edge of this
Side board about 1/2" (13mm) from the Bottom board & about 3/8" (9.5mm) from the center of the End
boards.
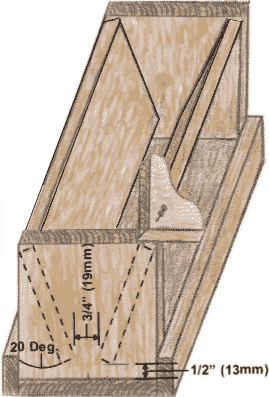
Make the other Side board have the complementary orientation (but start a couple inches (51mm) below
the highest part of the End boards slope, instead of flush with the lowest). This will
keep the bottom edge of this Side board also about 1/2" (13mm) from the Bottom board &
about 3/8" (9.5mm) from the center of the End boards & this then will provide a gap of about 3/4" (19mm)
between the two Side boards at the bottom for the birdseed to fall through to the Bottom board.
I wrote it & I can't understand it either - it gets better below.
4. Assemble the Bottom board to the bottom of the End boards. Assemble the two 1 1/2" (38mm)
wide "skirts" (from the Misc. piece), front & back. Assemble the "leftover width" (from the Misc. piece)
to the back.
Attach the Roof board at one end with a nail so that it will pivot (for filling with BirdSeed) &
use a "double headed" nail or similar (make it easily removeable) at the diagonally opposite end
to hold the Roof board in place when closed.
5. Paint is fine, on the outside, just avoid stain or lead based paint.
 Click here for:
  Bird House Plans

Dean Bentzinger wrote me:
"YOUR DIRECTIONS ARE CLEAR AS MUD
IMPROVE BY:
FLOOR PANEL 9 3/4 IN. LONG X 5 1/2 IN. WIDE
END PANELS 5 1/2 IN. WIDE X 6 IN. TALL ,( NO SLOPE )
SIDE PANELS 8 1/4 IN. WIDE X 5 1/2 IN. TALL.
BEVEL CUT 20 DEGREES FOR TOP TO FIT FLAT (or keep sides even with tops of ends)
FIND CENTER OF FLOOR PANEL ENDS AND MARK
MEASURE 3/8 IN. EACH SIDE OF MARK AND MARK
ATTACH ENDS TO FLOOR
LEAVING SIDE PANELS 1/2 IN. OR 1 IN. ABOVE FLOOR
ATTACH TO END PANELS AT OUTSIDE EDGE ON TOP AND TO LINES AT BOTTOM LEAVING 3/4 IN. SPACE INSIDE
ATTACH 9 3/4 IN. X 1 1/2 IN. EDGER PANELS TO FLOOR
HINGE TOP TO ALLOW FOR ADDING FEED"
 Comments?
  E-mail us
Home /
Genealogy /
Family /
Photos /
Crests /
Misc /
Surnames /
Links
Last Updated Friday, 11-Sep-2009 09:11:01 GMT

 Click here for:
  Bird House Plans

 Comments?
  E-mail us
